How to Install Artificial Grass: 6 Step Guide
Here is a step by step guide on how to install artificial grass. While ProGreen has an extensive network of certified installers, we completely understand that one of the best ways to cut costs on any home improvement project is to do it yourself. Your installation process may vary depending on which type of turf you’re going to install. ProGreen wants to ensure that we provide you with the best practices for your DIY artificial grass installation project.
ProGreen has been manufacturing and installing artificial grass since 1987. Our sister company SprinTurf actually specializes in commercial facility turf installations like collegiate and professional stadiums. Below is a detailed overview of the artificial grass installation procedure. All of these steps are vital to ensure your lawn, putting green or dog run looks its best. By following these steps you can prevent any future complications. If you ever have any questions about how to install artificial grass, please contact us.
Step 1: Measuring
Measure your yard with a 100-foot tape measure. Additionally, you can use an aerial map application like Google Maps to determine how much turf you will need. Typically you are going to first need to determine how many rolls of turf you’re going to need. Depending on where you purchase your artificial grass from will determine the width of your turf rolls. Typically the length of your rolls can be custom tailored to area you need to cover. Remember that when you’re selecting your turf type QUALITY MATTERS! The majority of “discount” turf you’re going to find online likely won’t hold up as well as ProGreen’s 100% Made in the USA synthetic turf.
If you need assistance using Google Maps, feel free to call us at 855-464-8873.
Step 2: Preparation & Demolition

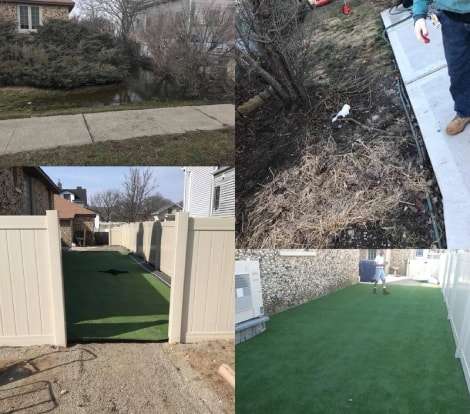
This is probably the most fun step in our how to install artificial grass guide. This is where you clear all vegetation and debris from your yard. Next you will add a base of crushed rock and level it. Typically you’re going to want to use a landscaping rake and tamping machine to ensure that your base is level. Additionally, if you are going to install a backyard putting green this is when you would form any undulations or breaks for the green. Next you will spray the base layer with water and compact the area with a water-filled lawn roller. This can be a somewhat painstaking task depending on how overgrown the area is. Make sure to be careful of thorns, debris, and any wildlife you might stumble upon.
Step 3: Turf Roll Out
Unroll and lay out the artificial grass, cut off the ends, and line up edges. Next, fold back the pieces of turf, roll out the seam tape in the middle of the two pieces. Finally apply the adhesive to attach the seams. Roll back one piece of turf onto the seam tape then line up the other side and repeat. Make sure you have the turf fibers facing towards your house. By applying the roll towards your home it will provide you with the best product finish. Our guide on how to install artificial grass again is a good outline for your project. However, you’re more than able to contact us directly for any assistance.
Step 4: Brushing
Use a stiff-bristled broom to make the grass fibers stand up. The grass fibers will be lying down due to being transported in a roll. A key tip is to make sure that the grass blades are folding towards your home. This is going to provide the best aesthetically pleasing view of the artificial grass.
Step 5: Artificial Grass Infill Application
Use a broadcaster/spreader to add sand between the grass fibers. A depth of approximately 1/2″ to 3/4″ is recommended. Once that’s complete, brush again to get the sand down to the artificial grass backing and to make the grass fibers stand on end. It is going to be very helpful if you buy a quality brushing machine for this process. If you don’t complete the brushing process well you might end up with a large amount of wrinkles left on your turf.
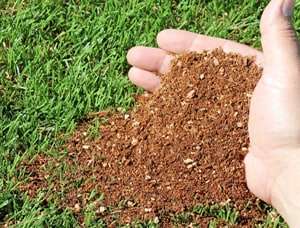
Here is an example of ProGreen’s Cooling Turf Infill. This particular type of infill is designed to trap ambient moisture in the air and slowly release it throughout the day. The slow release of moisture from this infill produces a lower ambient turf temperature. Applying the infill is a crucial step while installing artificial grass. The infill is going to act as the main ballast to ensure that your new turf does not have any wrinkles in it.

Step 6: Securing the Artificial Grass
Stake down the turf along the perimeter every three feet or so. If desired, add edging, rock or another border. You will want to use high quality nails about 6″ to 8″ in length. While you’re securing the artificial grass to the base layer you can start to work out any wrinkles that might still be present from the infill application step. Securing the synthetic turf is extremely important, especially if you have active dogs that are going to be playing on the turf.
Here is our video that will walk you through the installation process.
While your searching for how to install artificial turf please remember that ProGreen has a team of experts that will gladly provide you with assistance. This process can be overwhelming, and we are happy to help answer any questions you have on how to install artificial grass. Once you see what goes into the process you might decide to let one of our synthetic turf specialists come out to provide you with a free custom quote for your project. Our artificial grass installation guide might serve as a good starting point for your backyard turf project, but if you find yourself overwhelmed at any point we’d be more than happy to help.
Whether you’re looking for an artificial grass installer or just to purchase artificial grass directly from the manufacturer please give us a call. We will be more than happy to go over our catalog of 100% Made in the USA synthetic turf products. So, please do not hesitate to contact us by phone or visit our main website at PROGREEN.com


